
Ruby/Ruby on Rails Engineer based in Bangkok, Thailand 🇹🇭
Building a Solana Wallet Cross-Platform App with Expo, Web3 & React Native
As a developer I've been interested in the Blockchain space for long time and although a few years ago I started to learn Solidity for fun I didn't build something real.
Few weeks ago, having a coffee in one of my favorite places here in the island I started to read about Solana and I found some easy Node scripts to do the basic operations with Web3 so I did one of the most dangerous things you can do :D
$ expo init solana-wallet
I thought that build a basic Wallet App could be a good introduction to Solana and Web3 and let me practice more with Expo and React Native.
So I spent the rest of the weekend and some time more the next week building a fully functional Cross-Platform Solana Wallet App.
Screens and Features
The App is really simple. For now, it has these:
Welcome
This screen only shows a button to start!

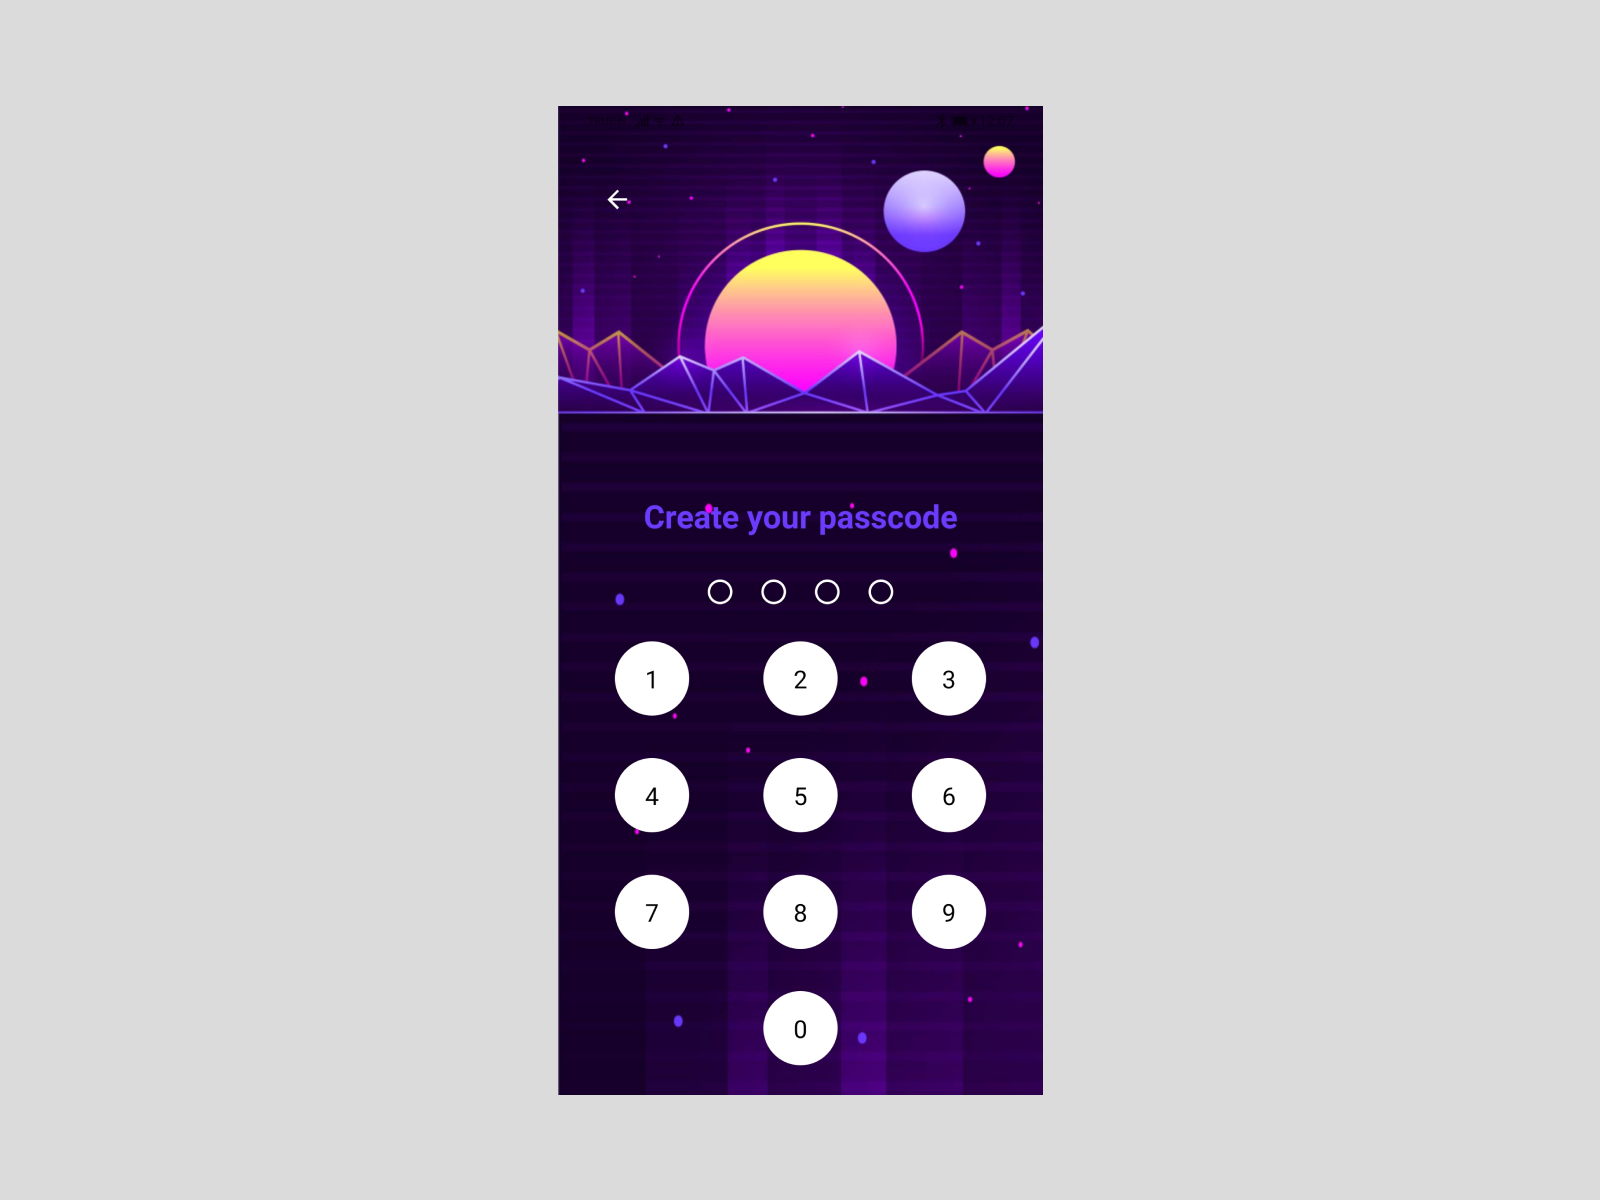
Create your passcode
This screen let you create a passcode that for now is only requested when you want to see your recovery phrase.
Later, it can be used to encrypt the seed, before doing a transfer or even to access to the full app.
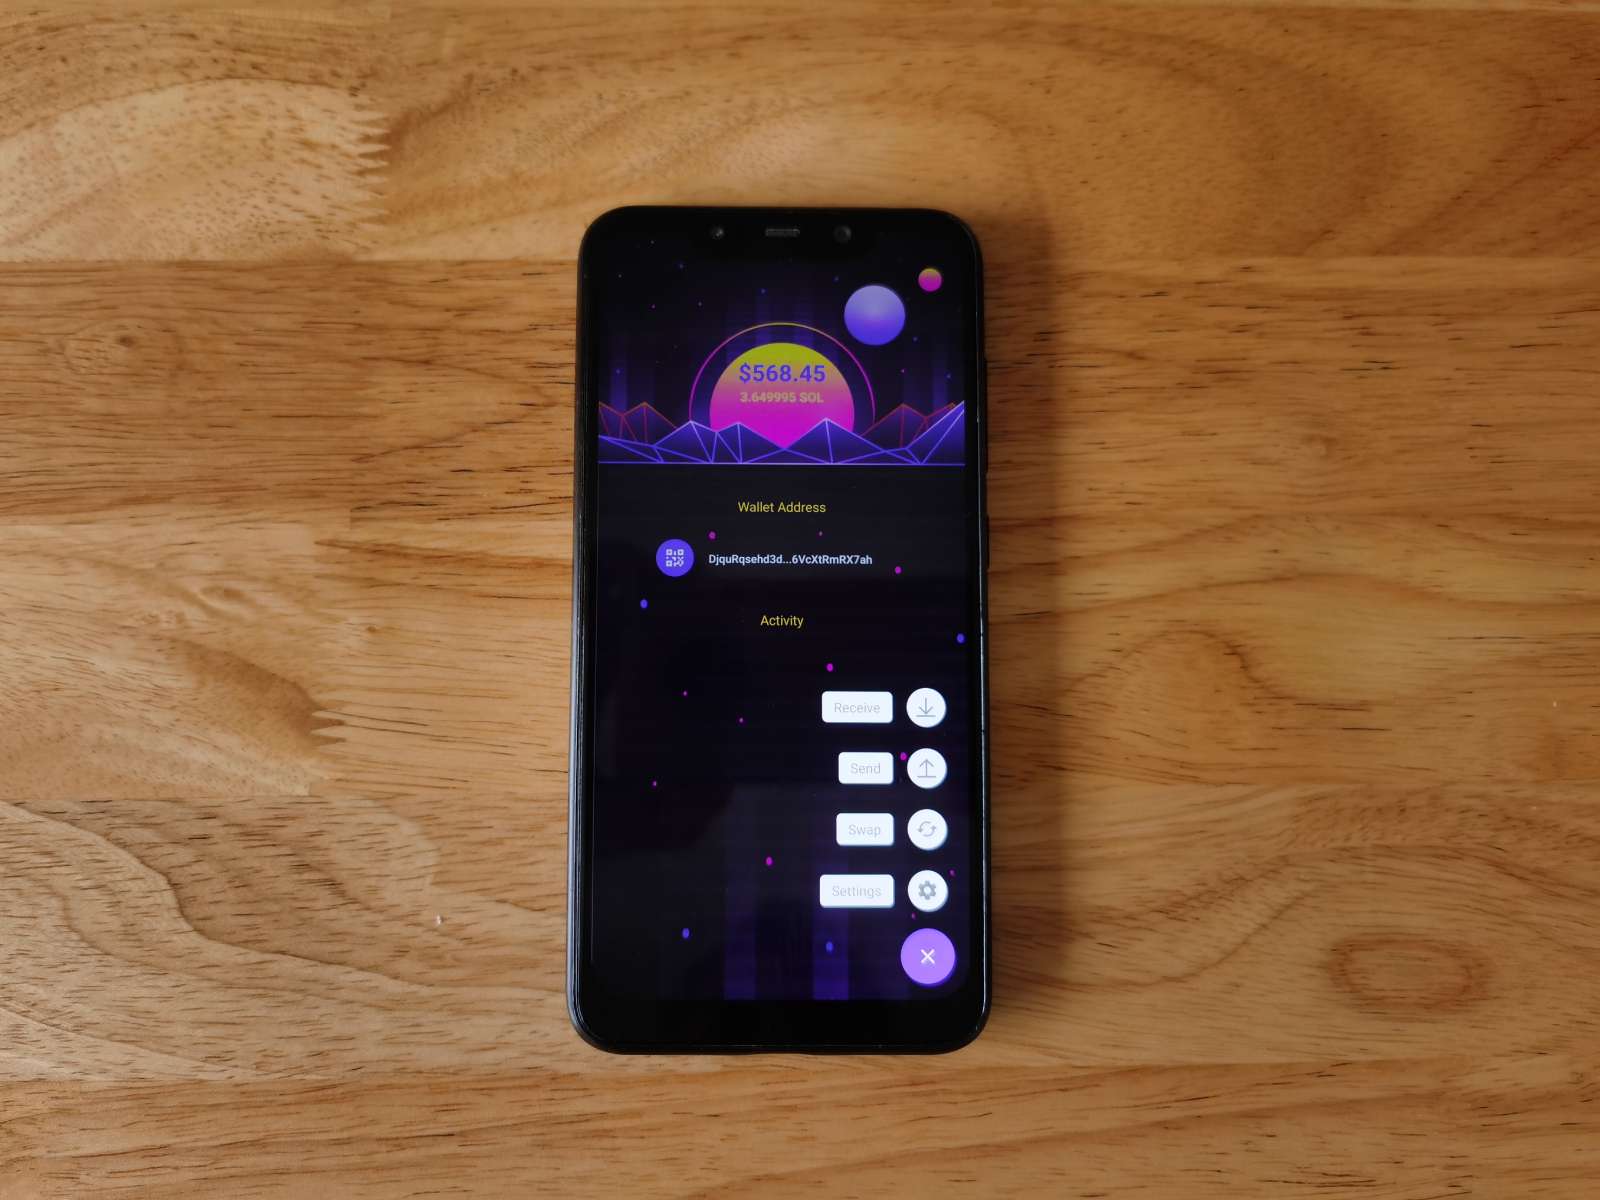
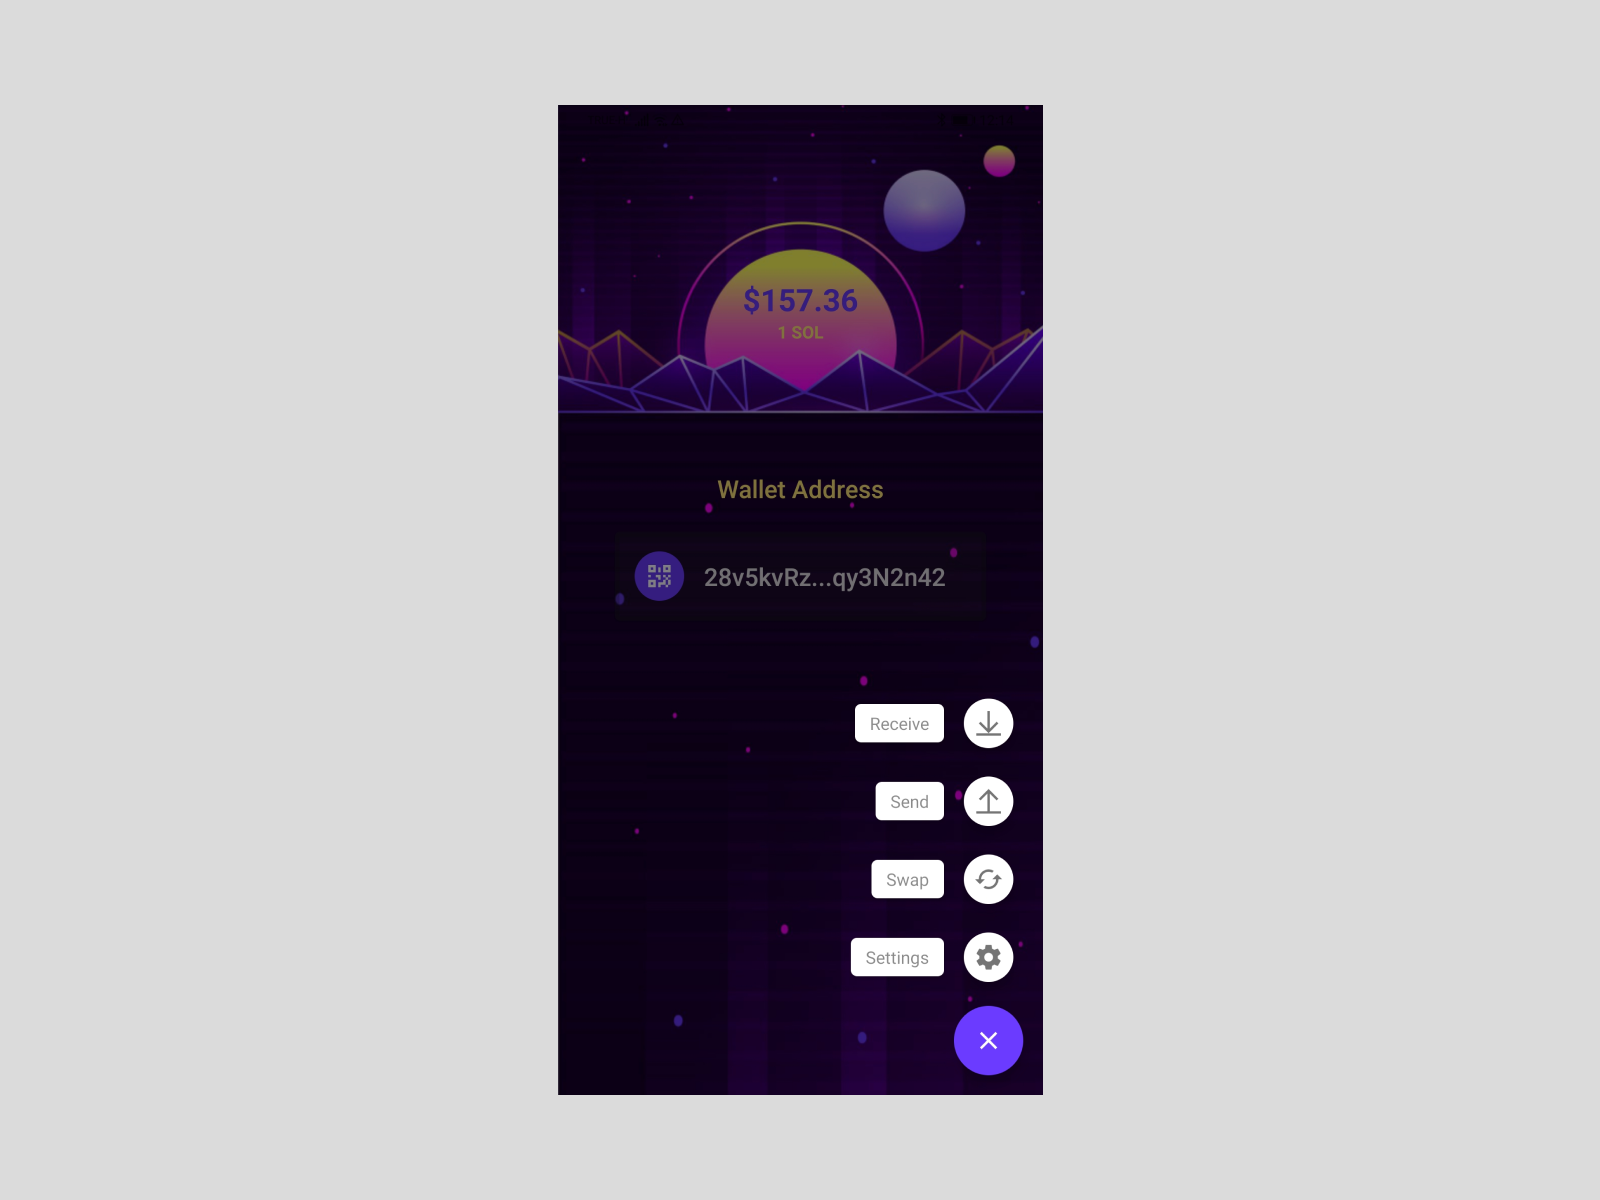
Dashboard
This screen shows the account balance and soon it will show the Activity of the account.
Also, it is where I placed the Navigation using a floating action button (component provided by React Native Paper)
Get account balance with web3:
const getBalance = async (publicKey) => {
  const connection = createConnection();
  const _publicKey = publicKeyFromString(publicKey);

  const lamports = await connection.getBalance(_publicKey).catch((err) => {
    console.error(`Error: ${err}`);
  });

  const sol = lamports / LAMPORTS_PER_SOL;
  return sol;
};
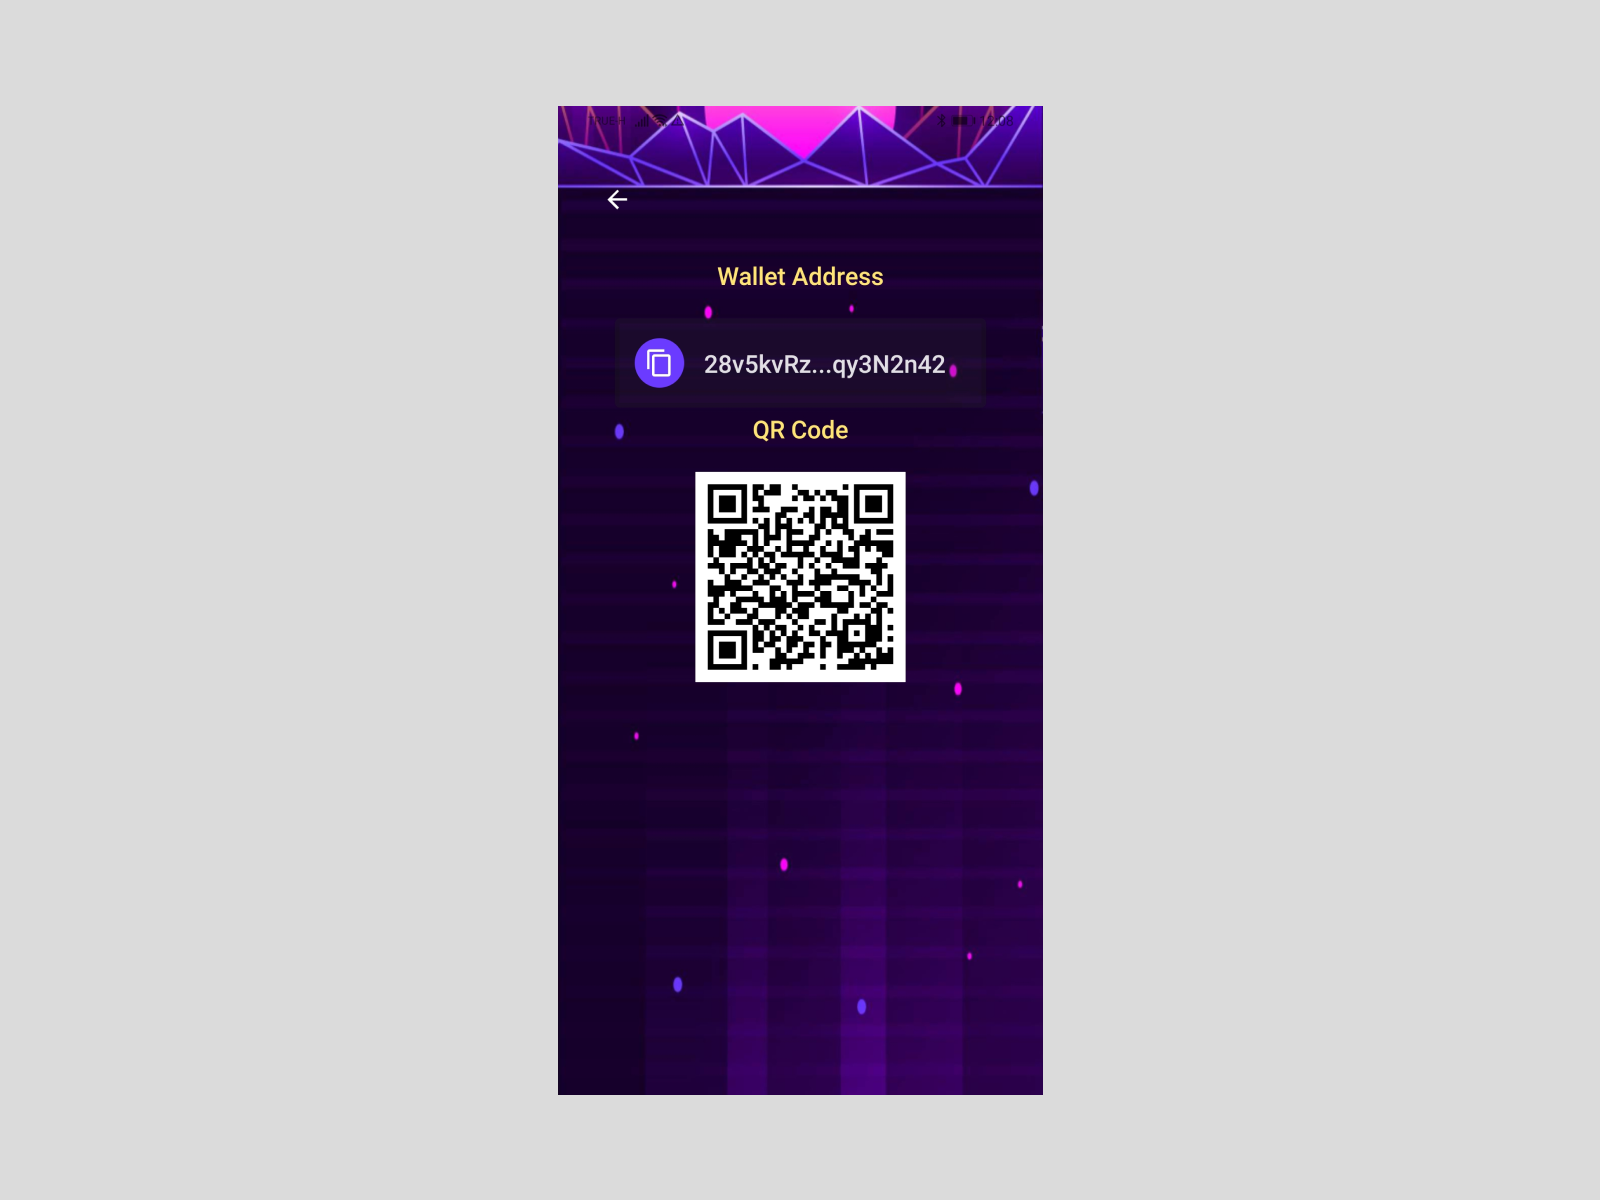
Receive
This screen shows the address and a qr to make easier receive tokens.
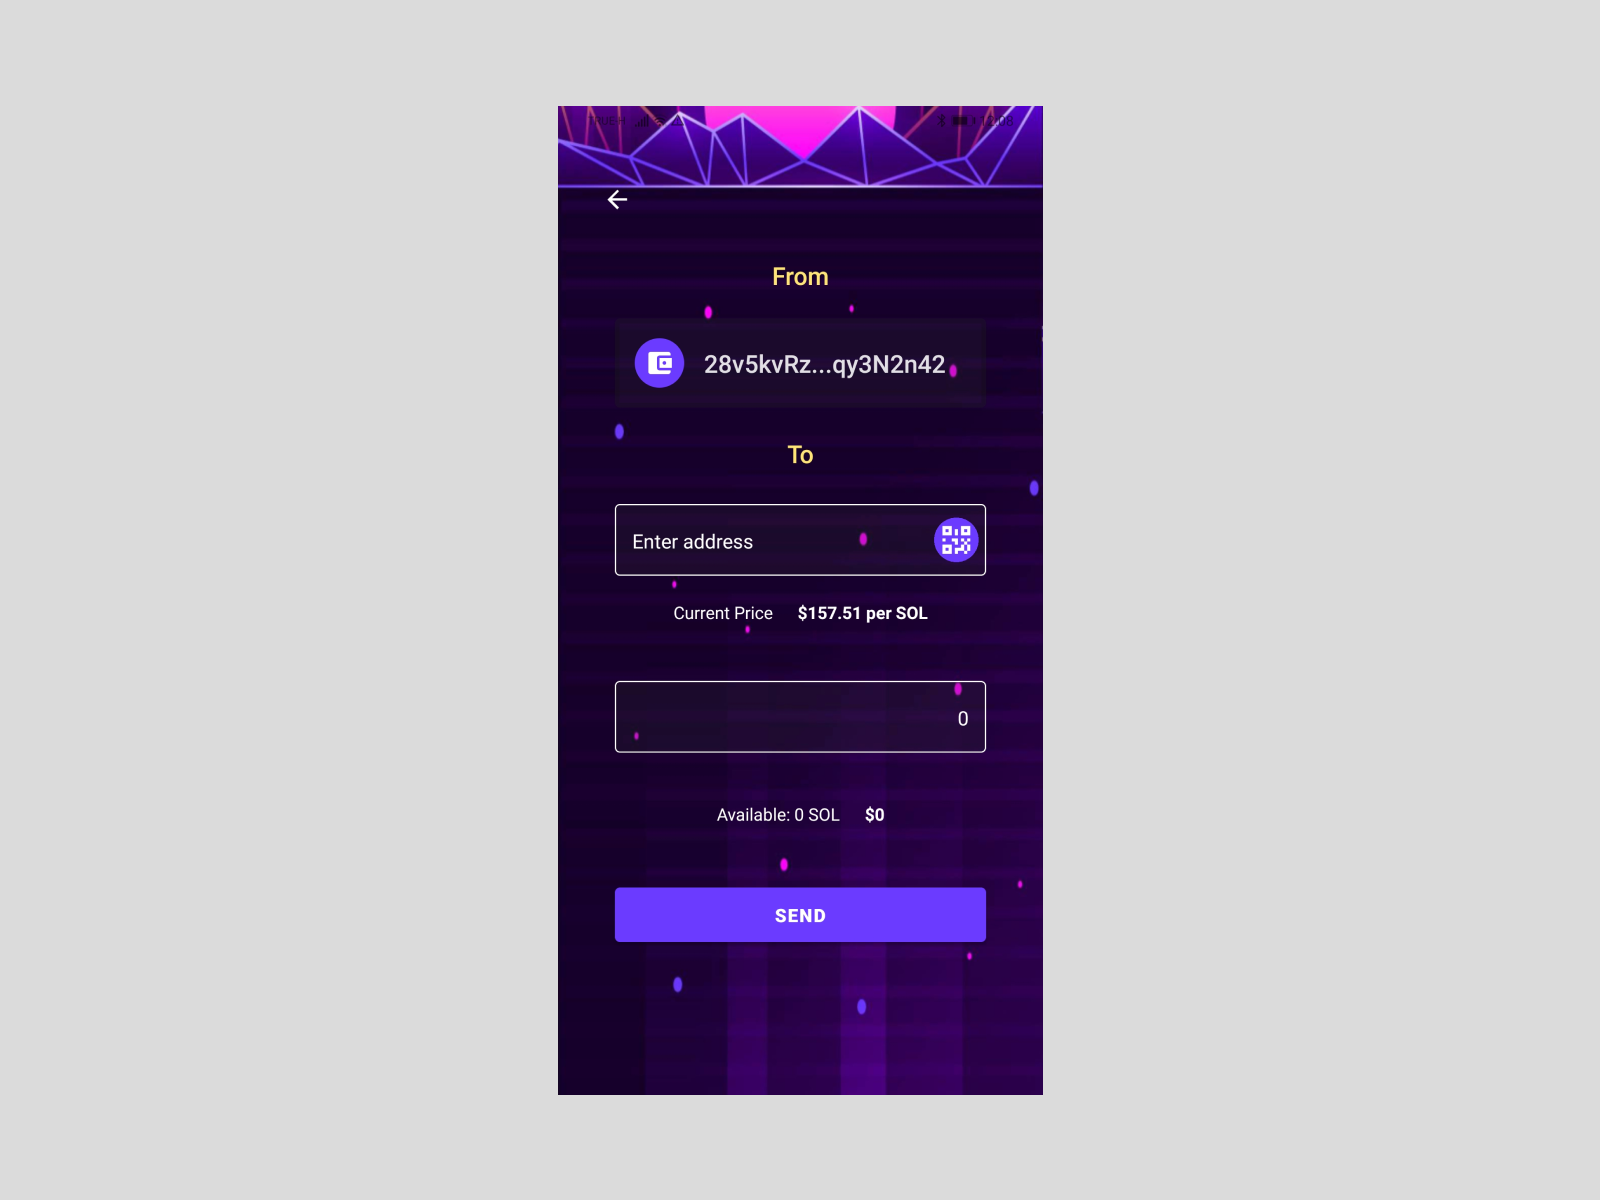
Send
This screen allows you to send tokens to other accounts typing the address or scanning a qr code.
Also, this screen shows the current price of SOL, SOL available in the account and convert the introduced amount to USD.
Validations are pending!
Create transaction with web3:
const transaction = async (from, to, amount) => {
  const account = accountFromSeed(from.seed);

  console.log("Executing transaction...");
  console.log(amount);

  const transaction = new solanaWeb3.Transaction().add(
    solanaWeb3.SystemProgram.transfer({
      fromPubkey: publicKeyFromString(from.account),
      toPubkey: publicKeyFromString(to),
      lamports: amount * LAMPORTS_PER_SOL,
    })
  );

  // Sign transaction, broadcast, and confirm
  const connection = createConnection();
  const signature = await solanaWeb3.sendAndConfirmTransaction(
    connection,
    transaction,
    [account]
  );
  console.log("SIGNATURE", signature);
};
Get Solana price using Coingecko API:
const getSolanaPrice = async () => {
  const response = await fetch(
    `https://api.coingecko.com/api/v3/simple/price?ids=solana&vs_currencies=usd`,
    {
      method: "GET",
    }
  );

  const data = await response.json();
  return data.solana.usd;
};
Settings
This screen shows two options:
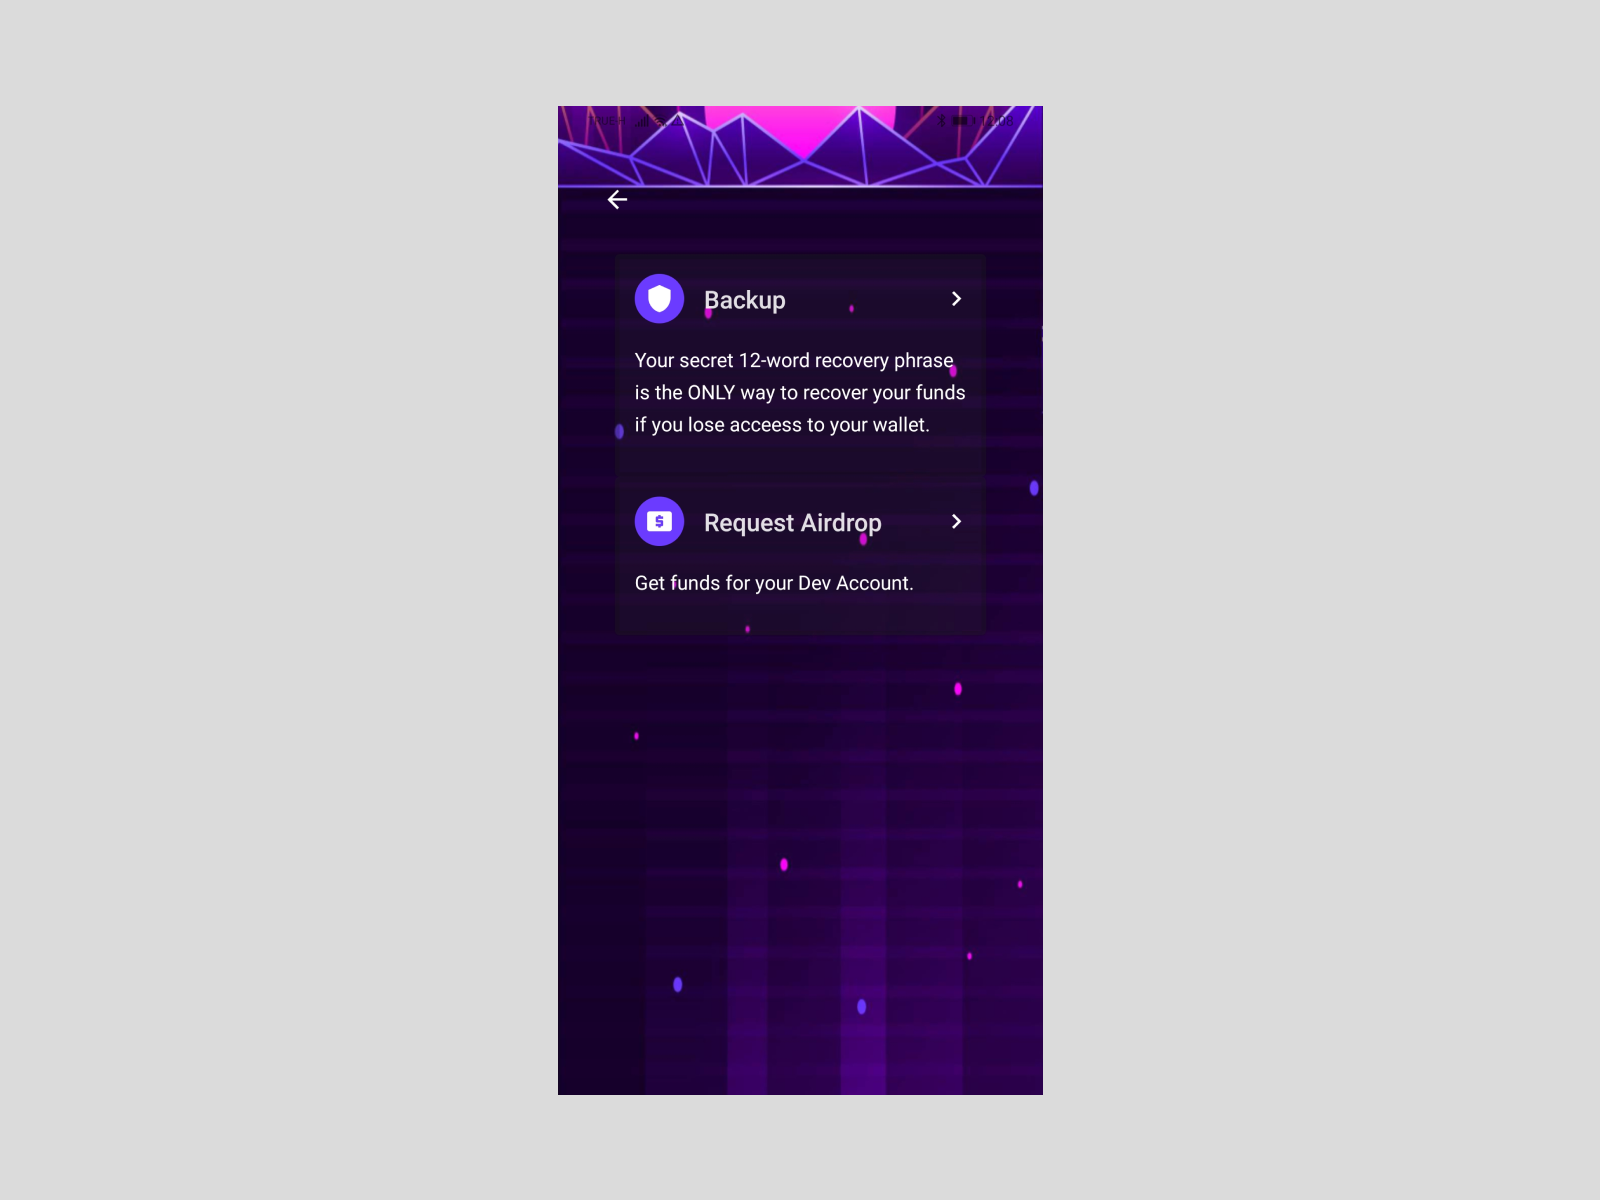
Backup
To access to recovery phrase. Before ask for passcode.
Request Airdrop
This app is configured to connect to dev network so the tokens showed are not real.
Good thing is that every time you press here you get 1 SOL in your account that can be used to test the app, make transfers…
Request an Airdrop in dev mode with web3:
const requestAirDrop = async (publicKeyString: string) => {
  const connection = createConnection();

  const airdropSignature = await connection.requestAirdrop(
    publicKeyFromString(publicKeyString),
    LAMPORTS_PER_SOL
  );

  const signature = await connection.confirmTransaction(airdropSignature);
  return signature;
};
What I used to build this Solana Wallet
Expo
Expo is an open-source platform for making universal native apps for Android, iOS, and the web with JavaScript and React. - Expo
Solana/web3.js
This is the Solana Javascript API built on the Solana JSON RPC API. - Solana/web3.js
Easy Peasy
Vegetarian friendly state for React. - Easy Peasy
React Native Paper
Paper is a collection of customizable and production-ready components for React Native, following Google’s Material Design guidelines. - React Native Paper
React Navigation
Routing and navigation for Expo and React Native apps. - React Navigation
More
Moreover I used other libraries for crypto, qr generate and scan…
You can check them in package.json
Problems that I found and workarounds to solve them
Crypto dependency
solana/web3.js needs Crypto that it seems that now it's included in NodeJS but no in React Native and although I found some ways to have it working in React Native I didn't find a way to do it without ejecting the app from Expo.
Finally I found a workaround that basically uses ethers.js and expo-random to be able to generate mnemonic and seed. Later, I was able to use solana/web3.js without issues to connect to the network, get balance, transfer…
const generateMnemonic = async () => {
  const randomBytes = await Random.getRandomBytesAsync(32);
  const mnemonic = ethers.utils.entropyToMnemonic(randomBytes);
  return mnemonic;
};

const mnemonicToSeed = async (mnemonic: string) => {
   const bip39 = await import("bip39");
   const seed = await bip39.mnemonicToSeed(mnemonic);
   return Buffer.from(seed).toString("hex");
};

const accountFromSeed = (seed: string) => {
  const hex = Uint8Array.from(Buffer.from(seed));
  const keyPair = nacl.sign.keyPair.fromSeed(hex.slice(0, 32));
  const account = new solanaWeb3.Account(keyPair.secretKey);
  return account;
};
Metro has encountered an error trying to resolve module 'superstruct'
Here the problem seems to be that the package entrypoint is a CommmonJS file. To solve it I added .cjs files to metro.config.js
module.exports = {
  resolver: {
    sourceExts: ["jsx", "js", "ts", "tsx", "cjs"],
  },
};
Some RN URL methods have no implementation
React Native react-native/Libraries/Blob/URL.js has no implementation for some methods.
Before, I was changing the 2 methods (protocol and port) manually but every time that I run yarn back to normal.
After a bit of research it seems that RN doesn't include this because the full implementation will increase a lot the size of the bundle but can be solved adding react-native-url-polyfill package.
$ yarn add react-native-url-polyfill
# App.tsx
...
import "react-native-url-polyfill/auto";
...
What's next
- Continue cleaning the code and remove packages that I'm not using anymore.
- Design doesn't adjust well. I used a Background only to see it nice when I was building.
- Give option to connect to Mainnet.
- Let the option to generate derived accounts, encrypt seed phrase…
- Integration with Serum for Swaps.
- Run as Browser Extension.
Final
My goal with this was to learn the Web3 basics building something simple and sharing 100% of the code between Web and Native.
I think it has been a good introduction to see how Web3 works.
If you think that it can be useful for you I published the repo here.
$ git clone https://github.com/jferrer/expo-solana-wallet.git
$ cd expo-solana-wallet
$ yarn install
$ expo web or expo start